
Chicken Kiev Recipe


Slice open one of these tender, breaded chicken breasts and a melted garlic and herb butter oozes from the centre. This chicken Kiev is easy but impressive!
Serves 4.
We use a 20ml tablespoon and 250ml measuring cup for all of our recipes.
4 chicken breast fillets (ours were about 180g each)
120g butter, slightly softened
2 large garlic cloves, peeled and crushed
1 tablespoon (firmly packed) finely chopped parsley, chives or other herbs
2 eggs
40ml (2 tablespoons) milk
50g (1/3 cup) plain flour, seasoned with salt and pepper
145g (about 1 1/4 cups) dry breadcrumbs
Oil for deep-frying
Trim any fat or sinew from the chicken breasts. Place each breast between freezer bags or baking paper and pound using the flat side of a meat mallet to about 1/2cm (1/4 inch) thickness. Don't pound the chicken too forcefully as any tears in the chicken could allow the butter to escape when the Kiev is cooking.
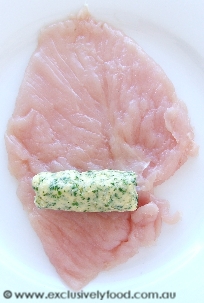
Place butter and garlic in a food processor and process until well combined. Alternatively, place butter and garlic in a bowl and mash together using a fork. Stir herbs into butter. Divide butter mixture into four equal portions. Form each portion of butter into a log shape.
Each piece of flattened chicken should be approximately rectangular in shape. Place a piece of chicken in front of you with the shortest side furthest away. Place a portion of butter near the edge of the side closest to you. © exclusivelyfood.com.au
Folding the sides in as you go, roll each piece of chicken away from you to completely enclose butter.
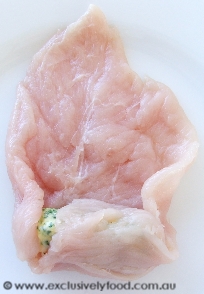
Place on plate, seam side down, and refrigerate for 30 minutes.
In a small bowl, lightly beat eggs and milk together using a fork or small whisk. Coat chicken in flour then shake to remove any excess flour. Dip in egg mixture, then coat with breadcrumbs. Dip in egg again and add another coat of breadcrumbs (this is to ensure the chicken is completely enclosed by the crumb coating).
In a large saucepan or deep fryer, heat oil to about 160 degrees Celsius. We used a saucepan half filled with oil. Fry 2-4 Kievs at a time, depending on the size of your saucepan/fryer. Ours took about 8 minutes to cook through. If your Kievs are well browned in only a couple of minutes, remove them from the oil so they don't burn, and finish cooking them on a tray in a moderately hot oven until cooked through. Drain on paper towels and serve. © www.exclusivelyfood.com.au
.png)


41 Comments:
It really is impressive! I've been promising my Fiance that i will make these for him as he is fond of chicken kievs, but never got round to it - yet! Thanks for the recipe it looks great.
Love chicken kiev, always wondered how you roll it to keep it form falling apart - yours look so professional
We were surprised how well they turned out!
There were a couple of things we did to help our Kievs hold together -
1. We rolled the chicken up tightly and made sure the butter was completely enclosed.
2. We coated the chicken with two layers of breadcrumbs.
I've found something that helps - after you've made the butter mixture, put it in the fridge so it goes hard again - makes it easier to form into rolls to put in the chicken, and also helps to stop it from escaping from the chicken when rolling!!!
Just wondering what oil i should use and how does the chicken stay together do you need to pin it with anything?
You can use any type of oil suitable for deep-frying (for example, peanut oil or canola oil).
The chicken doesn't need to be pinned to hold it together. Just make sure you
1) roll the chicken up tightly
2) refrigerate it for 30 minutes
3) coat it with two layers of breadcrumbs
Yumm .. chicken kiev .. I have only tried the birds eye one but ur looks gorgeous.. am not much of a cook so dont think i will make it x
Is it possible to include photos of the making of this step by step like you do for some of your other recipes...I just can't get the hang of rolling it...maybe I'm not making them thin enough to start with. Thanks.
We will be adding some step-by-step photos soon!
my brother and i have cooking comps.
this time i decided for my main to cook chicken kiev...i was going to by them pe made but look up chicken kiev n the internet and found this website...your photos look devide...im sure i will win thatnks to who ever posted this recipy! chicken keiv expert her i come!
thanks once more!
found this site by mistake and thought i'd give this recipe a go. cooked it for a friend that has made it many times, he was very impressed and said it was the best he'd ever tasted, the comments with suggestions helped alot so thanks to everyone for your help.
this looks sooo nice and your recipes are so easy to follow!
Even though I've lost my meat mallet and had to improvise with a hammer this turned out beautifully, thank you!
i have made these before and they turn out everytime.
you should try them who ever hasnt done this recipie yet.... its great!
Can these be cooked solely in the oven?
FANTASTIC! They were a bit funny looking but tasted great, Thanks
Hi! this recipe looks incredibly easy and i'm planning to make this soon. But heres a problem. You see i live in a student residence and the management refuses to provide us with an oven. so i was wondering, but my kievs get browned too quickly when deep frying and i don't have access to an oven... what should i do? or rather what do i do to make sure they dont get browned too quickly without the insides getting cooked?
thanks!
Hi Veronique,
We haven't tried cooking these chicken kievs solely in the oven, but it should be fine to do so. We recommend brushing or spraying the kievs with oil before oven baking them at about 200 degrees Celsius (180 degrees Celsius fan-forced) until golden brown and cooked through.
Hi Kaivearn,
We suggest that you watch the cooking kievs and reduce the oil temperature if they begin to brown too quickly. If they become too brown to continue deep frying but you don't think they would be cooked through, you could try transferring them to a frying pan over medium-low heat.
If you have a deep fry thermometer, heating the oil to 160 degrees Celsius should allow the kievs to cook through without overbrowning.
Thank God I found this site.
For years I have just sliced a pocket in the raw breast, then stuffed it with the mix, held it together with about 6 toothpicks, then coated it twice in breadcrumbs. Whether deep fried, pan fried or coated in oil spray and oven baked, the butter always leaked. I'll cook your recipe tomorrow night. Thanks, as I couldn't find this in any of my 40+ recipe books
Zombe
Would it be okay to prepare everything (up to the breading part) the day before and cook it the next day? Are there dangers of contamination or spoiling for that even if the chicken pieces are kept in the fridge? Thanks.
Hi Barb
The chicken Kievs can be partially or fully assembled the day before serving. Store them in the refrigerator (covered with plastic wrap or in an airtight container) and deep fry just before serving.
This is just what I was looking for. I want to try useing camembert cheese rather than butter though (got some like this from a butcher once). I'm also planning on oven bakeing them like others have, and was wondering if it would be ok to coat them with some butter/margarine rather than oil.
Also, about how long should it take in the oven?
Cheers.
Hi Scott
Yes, you could coat the Kievs with melted butter or margarine before oven baking. We would cook them at 200 degrees Celsius (180 degrees Celsius fan-forced) for about 40 minutes. If the Kievs begin to brown too quickly, reduce the oven temperature slightly.
What kind of herbs are used?
We use parsley or chives, but you can use any herbs you like.
Yummy is just one word to describe your receipe for chicken kiev, made today for the first time and very impressed with the outcome, made one happy husband..also made the lasanga for tomorrows dinner, cant wait
This was an awesome recipe and turned out great! i think my oil was a bit hot though cause it browned too quick, so i will put the next one in the oven. thanks!! :)
After deep fried the chicken kiev, how long still do i have to put in the oven before it could fully cook through?
It is possible to fully cook the Chicken Kievs by deep frying. However, if your Kievs become quite brown in only a few minutes, remove them from the oil and finish cooking them in the oven (otherwise they might burn on the outside before cooking through). The baking time needed will depend on the size of the Kievs and the extent to which they were cooked during deep frying. If you are unsure whether the chicken is properly cooked, you could check the temperature using a meat thermometer.
I made these, they were delicious.
I did have to use toothpicks to hold the ends closed but I took them out before frying and they were fine.
A bit big, I couldn't finish mine. :D
My brother is coming for dinner tonight and he loves Chicken Kiev. Will be making this recipe as it sounds so easy. I'll just need to add a bit more garlic :)
If i oven bake the chicken kievs, will the chicken turn out dry? btw i absolutely love this website so easy to follow!! i made the choc mud cake OMG it didnt even last 2 days in my house lol
We don't think the chicken will be dry if the kievs are oven baked. Please see the above comment dated 4/7/08 for our suggestions regarding oven baking. Glad to hear you enjoyed the mud cake!
has anyone successfully oven baked their kievs? how were they?
Made this recipe tonight and they were perfect - no leaks! I used some cling wrap to help roll them tightly and I chilled the butter mixture before rolling in the chicken.
I failed completely at these! Had them on vacation and wanted to treat my family to them as I loved them!
But they leaked and endud up being quite dry chicken with a crust.
Any idea how I can avoid this?
Just made this recipe, wonderful. I found that you really need to work the breasts so that they are very flat, mine were not quite there and I felt the need to hold them together with tooth picks. I cooked these in the oven, 200c for 35 mins and they were great, a real hit. 2x quite sizeable 370gm breasts.
We never knew kiev was made by wrapping the chicken around the butter....der! Injected butter into a breast was how we bought it! Tonight was so rewarding and delicious. Thanks ladies. You've got to love the internet. Five years ago this was posted and it is the way this family will enjoy this meal from here on. One question, would a lasagne machine be a way to flatten the breast?
I put my Kiev in the oven at 180 for about 25 mins (fan forced). I rapped it up in baking paper to keep the butter with it. I couldn't finish it all so my dog enjoyed the last little bits. I had this with potatoes cut in half and sliced in and brushed with oil with pasta and veggies.
This is so simple yet brilliant, I can't believe nobody has ever thought of this method before. I've never been able to make Chicken Kiev without the butter leaking. I've made this twice now and we love it, am doing it again tomorrow night. Thanks girls!
Made this recipe tonight but added sage & basil to the butter mix plus bacon & cheese when I rolled the chicken the whole family loved it I will be making it again with my added extras .
Review this recipe/article
Subscribe to Post Comments [Atom]
Have you made this? Share a photo in our Flickr group.<< Home