
Pavlova Recipe
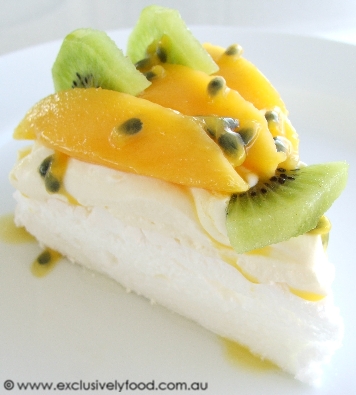
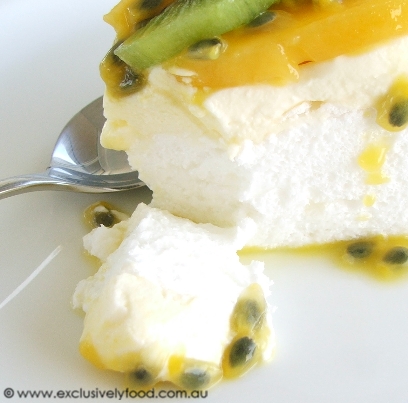
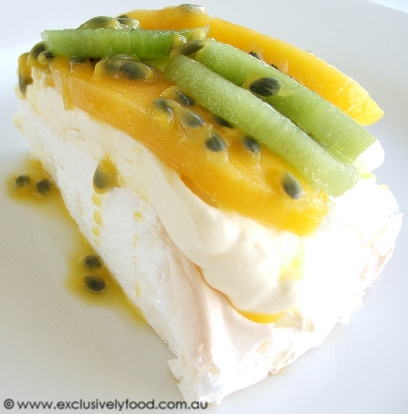
This melt-in-the-mouth pavlova has a soft, marshmallowy centre and a thin, crisp and fragile outer shell. Serve it topped with a generous amount of whipped cream and fruit. We like to use passionfruit and soft fruits such as berries, mango, kiwifruit and cherries.
Start this recipe at least 3 1/2 hours, and up to one day, before serving time. Measure out the cream of tartar and caster sugar before you start beating the egg whites so you don't have to stop beating to do this. For more information on separating eggs, see the tips at the bottom of the recipe.
There is no substitute for cream of tartar in this recipe.
Serves 8.
We use a 20ml tablespoon and 250ml measuring cup for all of our recipes.
4 large egg whites, at room temperature (we use eggs with a minimum weight of 59g)
3/4 teaspoon (1/2 teaspoon plus 1/4 teaspoon) cream of tartar
200g (3/4 cup plus 2 tablespoons) caster sugar
Topping
About 400ml (1 2/3 cups) thickened cream, whipped
Fruit of your choice
Preheat oven to 200 degrees Celsius (180 degrees Celsius fan-forced).
Using a pencil, draw a 20cm diameter circle on a sheet of non-stick baking paper. We trace around the inside of a 20cm diameter springform pan (base removed).
Place paper, pencil side down (so the pencil doesn't touch the pavlova), on a large baking tray. If your baking tray is a dark colour and you find it difficult to see the pencil line, you can place the baking paper on a light-coloured surface to make the line easier to see. Once you've spread the pavlova onto the paper, transfer it to the baking tray.
To make the pavlova, you'll need electric hand-held beaters and a large bowl, or an electric mixer with a large bowl. Ensure that the beaters and bowl are very clean as oils can prevent egg whites from whipping properly.
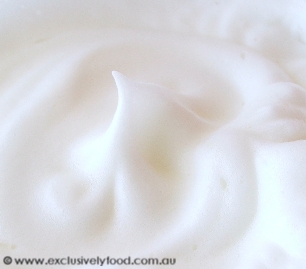
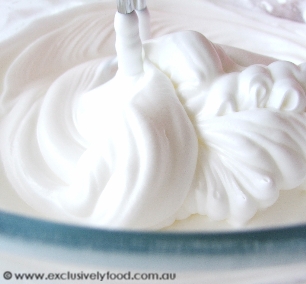
As soon as you begin to beat the egg whites, add the cream of tartar. Beat the egg whites on high speed just until they reach the following stage: when the beaters are lifted out of the egg white mixture, the mixture forms and holds a peak that doesn't flop over at the tip. It will probably take 1-2 minutes for your egg white mixture to reach this stage. © exclusivelyfood.com.au
Sprinkle one tablespoon of the sugar over the egg white mixture. Continue beating, and add one tablespoon of sugar about every 30 seconds.
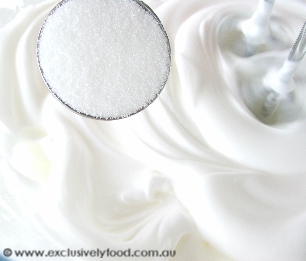
Once all of the sugar has been added, continue to beat the mixture for 2 minutes. The mixture should be very thick and glossy.
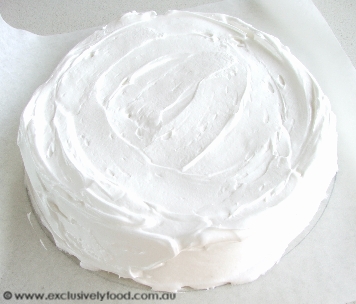
Pile the mixture inside the circle on the baking paper. Smooth the mixture out to form a cake shape, keeping to the pencil line.
Place the pavlova in the middle of the preheated oven, and then immediately reduce the heat to 100 degrees Celsius (80 degrees Celsius fan-forced). Bake for 1 hour. The pavlova will probably crack and sink during baking.
When the pavlova has finished baking, turn the oven off but leave the pavlova in the oven. Prop the oven door open a couple of centimetres (we use a folded tea towel). Leave the pavlova to cool in the oven for 2 hours.
Remove the pavlova from the oven and allow it to cool to room temperature. Then transfer it to an airtight container until required. When ready to serve, slide pavlova off baking paper onto a serving plate, top with whipped cream and fruit and serve immediately.
Separating eggs:
It is easier to separate eggs when they are cold. We separate eggs straight from the refrigerator then leave the whites to come to room temperature.
Ensure that no egg yolk gets into the egg white. If some egg yolk does get into the white, don't attempt to scoop it out: use the egg for another purpose. The presence of even a tiny amount of yolk can prevent the egg whites from whipping properly.
We crack an egg over a small bowl to collect the white, and then transfer the white into the mixing bowl before repeating with the next egg. This way, if you accidentally break a yolk, or if one of the eggs is bad, you won't spoil more than one egg white.
If you don't have an egg separator, you can use your hand. Use your fingers to catch the yolk while the white passes between your fingers into the bowl below. © www.exclusivelyfood.com.au


.png)


25 Comments:
wow, looks so yummy!!
This looks decadently gorgeous and the perfect thing to see in the new year. Here's to a fantastic 2008!
What gorgeous photos!
Wow! Looks divine.. my husband had pavlova and has been dying for me to make.. we are going to try it out tomorrow.. we'll see how it goes!
Hi!
When I made this, it tasted delicious. However, the shell was really thin and I couldn't really transfer it onto a plate, cos it was too floppy and started to break?
What did I do wrong??
Hi Jess,
It is normal for the pavlova to be very delicate. Did you use a cake server to lift the slices onto plates? If you would like the crisp outer shell of the pavlova to be thicker, increase the baking time to 1 1/2 hours.
want a good work-outr? try whipping the eggs with a hand held self egg beater
first time i made the pav it turned out perfect, but now i'm not getting the crispy outer, instead more of a glossy chewy outer. what i'm i doing wrong for this to ocurr. or what must i do to make sure i get the crisy outer apart from following the recipe.
help please!!
Hi Leo
Did you make any changes to the recipe? Sometimes the weather can affect the texture of pavlova. When you made the chewy pavlova, was it a very humid day?
my pavs are working out now. btw can the weather really effect the outcome? if so when is it best to make them. oh can i reduce the sugar amount so its not so sweet or will that effect the result too?
On humid days the pavlova is likely to lose its crispness more rapidly, so we prefer to make it on a dry day. Reducing the amount of sugar will alter the texture of the pavlova.
When I made this Pavlova it was perfect, with a thin crisp outer shell. It was actually the best Pavlova I had ever made. I thought I had lost the recipe and was very disappointed but not anymore because I found it again.
I want to make on Saturday but not eat until Monday. How should I best store a Pavlova?
What happens to the pav if you don't preheat the oven to 200 and then drop it down? Will the pav be undercooked?
Hi Happy jack
We recommend storing the pavlova unfilled in an airtight container at room temperature.
Hi
I make Pavs a lot and I reduce my sugar content and have no problem. Everyone seems to enjoy them more less sweet. Instead of 2oz sugar per egg white I allow approx 1.5oz. eg: If I am making a 10 egg Pav instead of 20oz caster sugar I will say use 16-17oz. I also put a couple of tablespns of cornflour in my recipe, works wonders.
My Recipe:
10 egg whites (room temp)
16oz caster sugar
pinch of salt
2 tblspns cornflour
dash of vanilla essence
Preheat oven 120 degrees
Place all ingredients in a large mixing bowl, except for the sugar, start mixing medium and then to high, poor the sugar in whilst mixing, mix for a good 20 mins-1/2 hour.
Place mix in a large foil baking tray or any large dish you may have. I set the timer to turn off after about 1 hour 20 mins, leave Pav in the oven to cool for at least 5-6 hours.
Cover with whipped cream and any sort of fruits you may desire.
Our favourites are Banana, Strawberries, Passionfruit, Kiwi Fruit.
Guaranteed Marshmallow centre and crisp thick outer, try it it's the easiest Pav ever, no need to fuss with all the gradual sugar additions
My family has a traditional pavlova filling that is delicious ...
You take tinned fruit salad in syrup (if you live in Australia then Golden Circle traditional fruit salad in syrup is the best) and heat in a saucepan.
Then you add 3 tablespoons of vanilla custard powder and stir until it thickens. Once thick you need to refrigerate the mixture until it is completely cool.
We spoon this over the pavlova and serve it with either vanilla ice-cream or cream - it's amazing.
Made this Recipe two weeks ago OMG absolutely devine!!! I am not a Pavlova lover myself but it's a favourite for my aunty and sister, I wanted to see if I could make it just as good as my mums and apparently it was better haha!!!! Thanks for another wonderful recipe, i'll be making the chocolate mud cake this week yummo!!!!
Looks absolutely delicious! Would I be able to make mini-pavlovas out of this recipe? I have a 3rd Birthday party coming up for my son. And if so how many would it approxiamtely make, what oven temperature would they need to bake for and for how long? Also, Is this mixture suitable for piping mini-pavlovas?
Made this pavlova for father's day and was beautiful and so easy to make. Have used this recipe on a few occasions and one pavlova is never enough!
Thanks for this recipe, it was the first time I made a pav and it turned out really well. I would like to make a bigger one for a BBQ, could I double the ingredients? If so, how long should I cook it, what oven temp and how big should it be? Thanks
Hi, this is amazing but I'm used to a bigger and higher pav. If I were to use 6 egg whites, how much cream of tatar and sugar would I need (is it proportional)? Also what would baking time be? Thanks so much, your site is the best!!
Hi, if I want to make a bigger pav could I just multiply all ingredients by 1.5? (6 egg whites etc)
What would baking time be?
How high is the 4 egg pav meant to be?
Thanks heaps! Your site is the best :D
The very first time I made this recipe quite a while ago it was perfection!!! However recently when I made it, the pavlova was completely stuck to the baking paper =( ... The next morning I had to re make another one but the same thing happened once more ... completely stuck to the baking paper and had to scrape the pavlova off !!!! and mind you pavlovas take such long time baking/cooling !!!
Does anyone know what could have gone wrong? Coz it worked perfectly fine the first time I ever made it. Not sure what happened this time around =( ....
This is a fabulous recipe - very different consistency of mixture than I've done before, but light and crispy and gooey and everything one would want!
I'd love to know whether I'd need to change the cooking time a lot if I doubled the quantities? I made it last night but it was really too small for the number of guests - we all got a small slice but wanted MORE!
Review this recipe/article
Subscribe to Post Comments [Atom]
Have you made this? Share a photo in our Flickr group.<< Home