
Lemon Tart Recipe


A slice of lemon tart with whipped cream and candied citrus peel.
This tart has a soft, smooth and tangy lemon filling, which is similar in texture to a baked custard. We like the filling to be quite tangy, but if you would prefer a milder flavour, the tart will still turn out well if the amount of lemon juice in the filling is reduced to 125ml (1/2 cup). The filling is partially cooked on the stovetop before being oven baked in a precooked pastry case.
The buttery pastry can be difficult to work with. If you don't wish to roll the pastry out or if it breaks when you are lifting it into the pan, you can use your fingers to press the dough evenly over the base and up the side of the tart pan. If desired, the pastry case can be baked the day before filling and stored in an airtight container at room temperature.
Serves about 9-10.
We use a 20ml tablespoon and 250ml measuring cup for all of our recipes.
Pastry
162g (1 cup plus 1 tablespoon) plain flour
38g (1/4 cup) self-raising flour
60g (1/3 cup, firmly packed) pure icing sugar, sifted
100g cold butter, chopped into about 15 pieces
1 large egg yolk (we use eggs with a minimum weight of 59g)
Lemon Filling
4 large eggs (we use eggs with a minimum weight of 59g)
40g (2 tablespoons plus 1/2 teaspoon) butter, chopped into a few pieces
166ml (2/3 cup) cream (35 to 40 percent fat)
166ml (2/3 cup) fresh lemon juice
200g (3/4 cup plus 2 tablespoons) sugar
Pastry
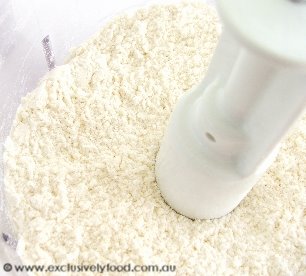
Place plain flour, self-raising flour and icing sugar in a food processor and process on medium speed for about 20 seconds to combine the ingredients.
Add the cold butter to the flour mixture.

Process on medium speed for about 15 seconds, until only tiny lumps of butter remain (any butter pieces should be smaller than a grain of rice).
Add the egg yolk to the processor and process on medium speed until the yolk is incorporated and the mixture just starts to clump together (about 30-60 seconds). During processing, you may need to stop the machine and run a spatula around the side at the base of the bowl to dislodge any unincorporated ingredients.
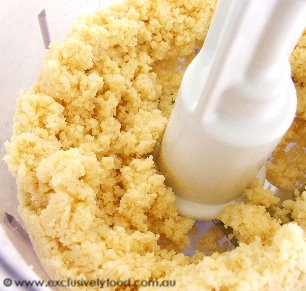
Remove the processor blade and use your hand to press the dough clumps together into a mass. Tip the dough onto a large sheet of baking paper (the paper can be reused when rolling out the pastry).
Use your hands to bring the pastry together into a smooth ball. Form the pastry into a disc shape.
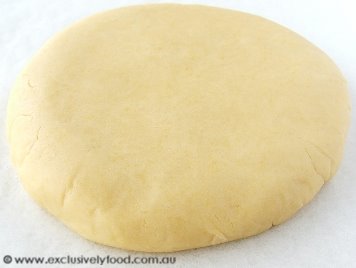
Wrap pastry disc with plastic wrap or place in a freezer bag, and refrigerate for two to three hours.
After at least two hours resting time, remove the pastry from the refrigerator and leave it at room temperature for 10-30 minutes, until just soft enough to roll out (the time required will depend on the temperature of the room).
Adjust the oven rack to the lowest shelf position; the pastry base will brown and crisp better if it is close to the bottom element. If possible, set your oven so that the top and bottom elements are on, and the fan, if present, is off. Then preheat oven to 180 degrees Celsius. If you have a fan-forced oven and aren't able to turn the fan off, preheat your oven to 160 degrees Celsius.
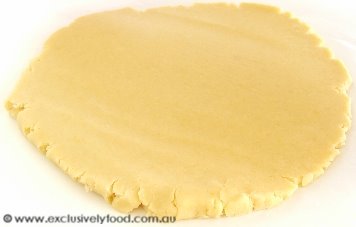
Place unwrapped pastry disc between two large sheets of baking paper. Using a rolling pin, roll pastry out to form a 29cm diameter circle. The pastry circle should be just large enough to line the pan; if you make the circle much larger, the pastry will be too thin.
When rolling the pastry out, you may find that the edges of the pastry start to develop large cracks as in the photo below.
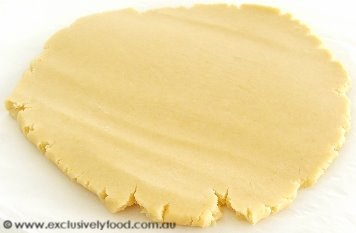
If this happens, use your fingers to press the pastry back together to repair the cracks.
The bottom sheet of baking paper may develop creases during rolling. These creases can make deep cuts in the pastry. To help prevent this, we do the following once or twice during rolling:
1) Leave the pastry between the two sheets of baking paper. Flip the paper and pastry over so the bottom sheet of baking paper is now on the top.
2) Lift the top sheet of baking paper off the pastry to remove the creases, and then place the paper down again and continue rolling.
Ensure the pastry shape is as round as possible. If it isn't round, the pastry may not completely line the pan. Once the pastry is rolled out to the desired size, we briefly place it in the freezer to make it easier to work with and help prevent it from breaking when transferring to the pan. We leave the pastry between the sheets of baking paper, place it flat on a large tray/board and put it in the freezer for 2-3 minutes to firm up. © exclusivelyfood.com.au
When you are ready to transfer the pastry to the pan, loosen the top sheet of baking paper by lifting it off the pastry and then placing it back down. Keeping the pastry between the two sheets of baking paper, flip the paper and pastry over so the bottom sheet of paper is now on the top. Remove the top sheet of baking paper. This process of loosening the paper makes it easier to lift the pastry off the baking paper when transferring the pastry to the pan.
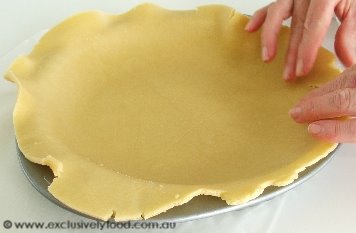
You will need a 3cm deep, 23cm base diameter loose bottomed tart pan. If you have experience lining tart pans with pastry, you can ignore the next paragraph. The following instructions for lifting the pastry into the pan would probably suit left-handed people, so use the opposite sides/hands if you prefer.
Place the pan to the right of the pastry round. With your left hand, hold the rolling pin above the pastry. Work quickly to help prevent the pastry from breaking. Use the baking paper to lift the right side of the pastry up and drape it over the rolling pin.

Leave the pastry resting on the rolling pin and return the baking paper in your hand to the bench.

Slide your right hand between the pastry and baking paper still resting on the bench. Lift the pastry with your right hand and move the pastry to the left side of the tart pan. When the pastry is in the correct position, slide your right hand to the right, using it to support the pastry as you roll it off the rolling pin and into the pan.

Ease the pastry into the pan.
Fold down any pastry that extends above the top rim of the pan and press it onto the edge crust to reinforce. Trim the edges of the pastry to neaten.
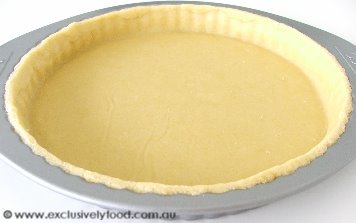
Place pastry in freezer for 15 minutes.
Scrunch one of the sheets of baking paper that you used when rolling the pastry, until the paper is soft and pliable. Flatten the sheet of baking paper and use it to line the pastry case. Then half fill the case with raw rice, dried beans or pie weights and gently push the rice/weights up against the side of the case to support the edge crust.
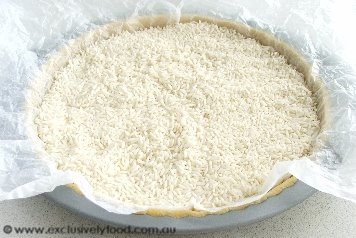
Place pan on the lowest oven rack and bake pastry for 25 minutes. Remove pastry from oven, and carefully lift the baking paper and rice/weights out of the pastry case. Return the pastry to the lowest oven rack and bake for about 10 minutes, until a light golden colour.
Place pan on a wire rack and allow pastry to cool for at least 30 minutes before starting filling.
Filling
When ready to start the filling, preheat oven to 160 degrees Celsius (140 degrees Celsius fan-forced).
You will need a double boiler, or a medium-large saucepan and a large heatproof bowl that is wider than the saucepan. One-quarter fill the saucepan with water. Sit the bowl on top of the saucepan and check that the base of the bowl doesn't touch the water (use a different bowl if necessary). Remove the bowl and bring the saucepan of water to the simmer.
Place eggs in the bowl and lightly whisk with a fork or whisk to combine, but not aerate. Add butter, cream, lemon juice and sugar to the bowl and use a heatproof spatula to stir to combine (the butter won't combine with the other ingredients at this stage).
Sit the bowl on top of the saucepan, and stir the mixture constantly with the spatula, scraping the base and side of the bowl to prevent the mixture sticking to the bowl and overcooking. You may need to adjust the heat to keep the water at a simmer (don't allow the water to boil). Continue stirring the mixture until it thickens slightly and a thin layer clings to the spatula (about 15-20 minutes). If you draw your finger across the spatula, a clear trail should remain in the filling clinging to the spatula. You will probably notice small white pieces of egg in the filling (one such piece is shown on the spatula below).

Strain the filling into the pastry case to remove the lumps of egg. Smooth the surface of the filling with the spatula or the back of a spoon.

Baking, Serving and Storage
Bake for about 18-20 minutes on the lowest oven rack. The tart filling should be set around the edges and the centre should be slightly wobbly when the tart is gently shaken.
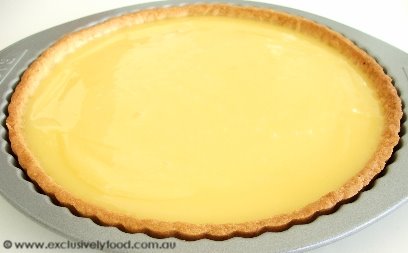
Place tart on a wire rack to cool completely.
The tart can be served at room temperature or refrigerated until cold. Serve with whipped cream or ice cream, if desired. The tart is best eaten on the day of making as the filling will soften the pastry over time.
Store tart in an airtight container in the refrigerator. Not suitable to freeze. © www.exclusivelyfood.com.au

Click here for a PDF version of this recipe (text plus photos)
.png)


25 Comments:
this looks devine im going to make this i love lemon tart
Lemon tart has to be my most favourite dessert - can't wait to try it!
Do you have a variation for pear tart?
Hi Annette
Unfortunately, we don't currently have a pear tart recipe.
I made this last night and just tried a piece, and wow, absolutely divine! So much easier that another lemon tart recipe I've tried, and tastes so much better!
I did have a couple of problems last night through. First, when i places the pastry in the pan, in the 'corners' between the walls and the base of the pan, the pastry cracked. Is this because it wasn't in the freezer for enough time after rolling out?
Also when straining the filling into the case I found alot of egg lumps, quite a bit larger than those in the photos. Does this suggest the mixture was slightl overcooked?
Once again, thanks for the fantastic recipe!
Made this one last night.. Was a long time in the making but very worth it. I would never have attempted such a recipe with Exclusively Food. You gals think of everything.. Oh and the tart turned out amazingly well, I swapped lemon juice for lime juice though. Glad to report I didn't have any issues, even with the pastry and it tastes so much better than a store bought one.
Hi .. looks delicious. How long would you cook them for as individual tarts?
Thanks
I used a store bought pastry because I was lazy (it was 1 in the morning and I wanted it fast :P) and it turned out disastrously, so I'll definitely be making my own pastry next time!
Is there any way to prevent the cream from curdling with the lemon juice? I threw in all of the ingredients at the same time - perhaps I should have combined them individually first or something
I'm making it again right now, and I combined all the liquids + sugar thoroughly, and dribbled in the lemon juice whilst stirring very quickly, and it didn't curdle at all :)
In fact, it was so smooth that straining the mixture wasn't necessary at all. The pastry's in the oven right now, so hopefully it will turn out better than it did last time :)
Hi,
I want to try to make this yummy lemon tart, may I ask what kind of creme are u using? creme cheese? creme fraiche? thanks
Thank goodness for this recipe. My boyfriend had been nagging me to make him something sweet and I decided to make this recipe as we had lots of lemons on the tree. He loved it and so did I.
Thanks Amanda and Debbie
What is the oven temperature for baking the pastry?
Thanks for the recipe, the tart turned out perfect.
Can I just say: YUM!
I made this a few days ago, and, as per the warning, the pastry has gone a bit soft. But you know what? It's almost better that way!
With the filling, I mixed the egg, cream, and sugar with a whisk, and i kept whisking while I slowly poured in the lemon juice, as I've had problems in the past with lemon tarts curdling. I added the butter last, after I put the pot on the stove.
It's a beautifully creamy tart, with just the right amount of kick to offset the sweetness.
This is my go-to for lemon tart now!
I made this tart on the weekend and it was delicious! I will definately make again.
Can you use this recipe for mini tarts?
You could use this recipe to make mini tarts but you will need to adjust the baking times. You may have some excess filling because the ratio of pastry to filling tends to be higher for mini tarts.
Will be making this tomorrow! We have such an abundance of lemons, I'm going to be busy over the next few days!
I've made some of your dessert recipes(only two, though...) but they've both been very successful. I was going to make this for a friend for her birthday, hopefully it turns out alright! What kind of cream do you use? I need to make it in a day or two so it'll be great if you could get back to me. If not, I'll just use thickened cream. Thanks :)
Great recipe! It was easy to follow and do, and this is my first time making lemon tart. Came out beautiful, though I think the filling wasn't quite set yet. Absolutely delicious, though could use a bit less lemon juice, I think. Thank you for such a great dessert!
gr8 recipe, thanks for sharing
Made it right now...superb taste of lemons. Just lovely. Thanks for the recipe :)
This was fantastic, your step by step instructions were so helpful! I have tried quite a few times over the years to make lemon curd but have been way too impatient and also didntknow how it should look etc.
Thank you so much, I know I will make this many more times!!
Best lemon tart ever! Very easy to make also. I'm very sensitive to egg flavours in tarts and cheesecakes, don't like it at all, but this was divine! Used the 2/3 cup lemon juice and it was perfect. Won't be looking for any other lemon tart recipes from now on!
Hello ladies. Firstly I just wanted to say I LOVE your blog and I'm yet to have anything but brilliant results from your recipies.
Secondly I'd like to make these as mini tarts for a birthday party afternoon tea. Because I'll have a few things to do on the day, I'm wondering if you think I could make the tart cases the day before, and if so, do you have any suggestions for how I could store the cases to stop them from going soft? Thanks for your good work!
Cheers,
Kerry
Absolutely delicious!! This is the 4 th time I have made this scrumptious lemon tart and every time it has come out perfectly! Now I know/understand how to make a lovely pastry! Everyone loves it!! Thank you!!
Review this recipe/article
Subscribe to Post Comments [Atom]
Have you made this? Share a photo in our Flickr group.<< Home